I have taken a two-pronged approach this time: A short version, for those who are not interested in the technical aspects, and a much longer version for those who are.
Short version: we built something to preheat the ventilation air for our house using the heat of the earth. It works and gives us lots of “almost” free heat. If you’re interested to know how, read on. If not, see you next post!
Much longer version: my German-immigrant father used to talk about using pipes in the ground to cool air for the house; kind of a simple air conditioning system. Such a system could also be used to preheat air in the winter because the earth maintains a nice intermediate temperature. Of course he wasn’t the only person to think about that, and he certainly didn’t invent it or even build it, but that’s how the sliver of that idea got lodged into my brain.
Fast forward to years later, while studying to be a Passive House practitioner, I began to learn about how such things were being implemented, and more importantly, how they work, how effective they are or aren’t, and what are the benefits.
While designing the Zero Carbon house, it was a foregone conclusion that I would use earth energy to preheat the ventilation air supply. However, there was a decision to be made between two system types:
- Earth Tubes, where the air is passed underground inside tubes and exchanges heat through the walls of the tube; or
- Ground Loops, where a freeze-protected fluid is passed through buried pipes to exchange heat with the soil, then passed through a fluid/air heat exchanger (like a car’s radiator) as the air enters the house.
The merit of the Earth Tube system is that it is conceptually simpler and doesn’t involve any secondary media like glycol, or associated pumps and mechanical systems like a heat exchanger. The downside is that (in my opinion) it should also include a bypass tube for air to enter more directly, a damper to redirect flow, protection against critters and insects from entering the earth tubes, careful sloping of tubes to direct condensation to a drainage pit, selection of materials to avoid growth of mould or mildew and a means of cleaning the tubes.
The merit of ground loops is mostly simplicity during construction: just lay out your tubes in the soil at whichever stage is appropriate and run them into the house in a position where they will be useful at a later stage. Ground loops don’t need to be sloped for drainage and can be run in and out of the many different excavations that might be made on the building site during the various stages of construction. Places where ground loops can be placed include:
- Under slabs: on top of the soil before backfilling with stone, insulating and placing concrete;
- Beside footings, before backfilling with soil;
- In trenches dug for utility connections or for drainage.
On the downside, ground loops require careful selection of the heat exchanger for optimal performance, care to size the loops appropriately for diameter and length, appropriate selection of pump and piping, and inclusion of the proper mechanical items for the closed loop system. That requires the design or guidance of a qualified hydronic system designer. They should also use a freeze-protected fluid due to the risk that the fluid may stop moving. Were water to be used as a heat transfer fluid, it could then result in the winter air freezing and rupturing the heat exchanger core.
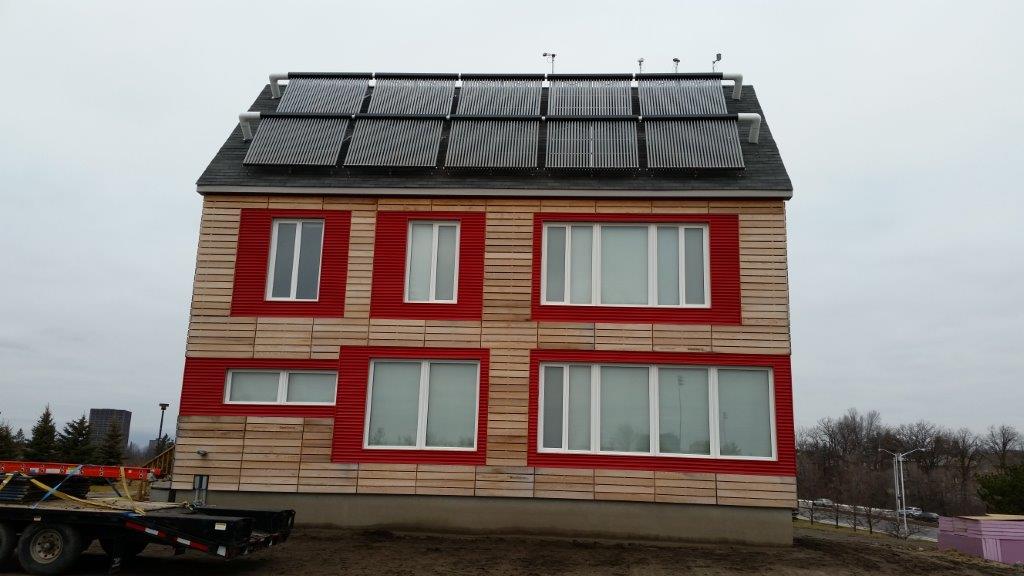
In our case, the decision was simple: ground loops. Much of our work has for years been involved in designing and building solar thermal, hydronic, and even forced air heating systems. Compared to some of our more complex systems – like the new solar energy laboratory system at Carleton University (see picture to left) – this is child’s play. But I digress….
Our ground loop system looks like this:
- 1,000’ of ¾” PEX in three equal length loops buried as follows:
- One length running out and back at 10’ below grade in a trench that was dug during initial excavation for gravity drainage. (Another energy-saving and peace-of-mind feature: gravity drainage. It is nice to know that I will never need a sump pump or be at risk of a power failure leading to the flooding of my basement.)
- Two lengths placed outside the foundation between 10’ and 6’ below grade.
- Isolation valves and manifold headers appropriately sized to keep flow balanced.
- 15”x20” fluid to air heat exchanger.
- BioGreen 60 (60% 1,3 Propanediol) heat transfer fluid, a corn-derived, food grade, freeze protected heat transfer fluid (available from EcoGen Energy).
- Multi-function ECM circulator for low rate energy consumption.
- Expansion tank, air separator, and other associated close-loop system components.
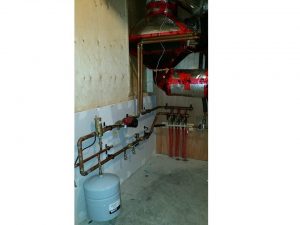
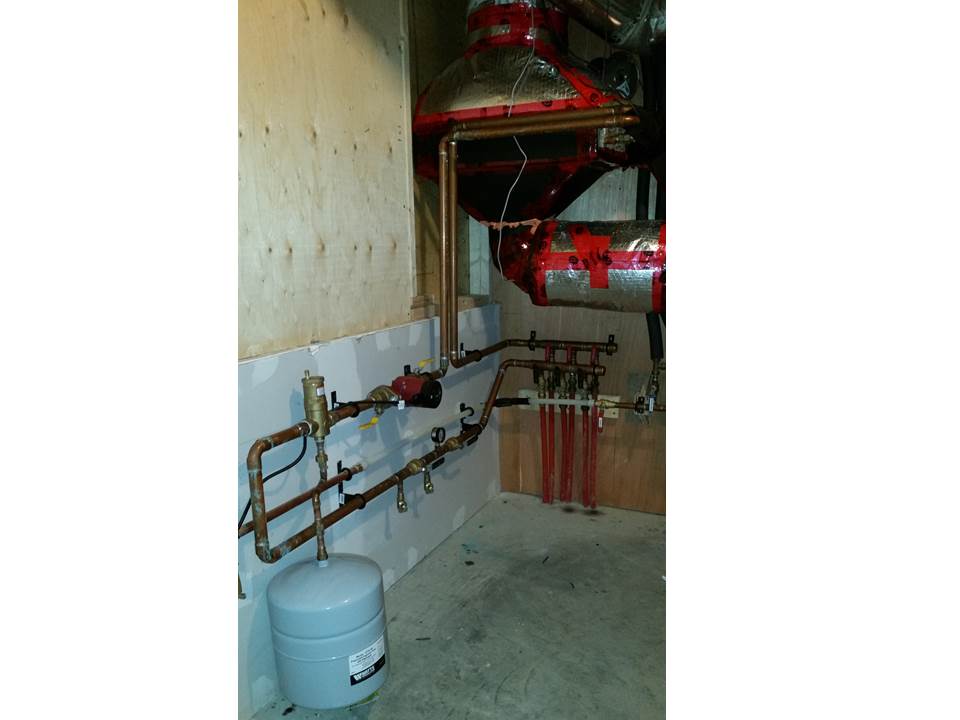
The funny part of our system’s story is that I didn’t get around to connecting it up until late in February this year. You’d think I was eager to get it working, but I was working on other things to make the house more “liveable” and to get the interior finished. My main motivation to install the ground loops system was the freezing up of our ERV’s inlet chamber and filter. As it was, the very cold weather we’d had earlier in February led to condensation in the heat exchange core of the ERV. Fortunately, I’d already installed the fluid-to-air heat exchanger with the ducting, and the ground loops were already poking out of the floor, so I just had to “connect the dots”. So, out came the copper, brass, mechanicals, torch and tools and by the end of the day we were up and running. A simple solution without any control yet; just plug the pump into the outlet (it came with a grounded plug) and select the operating mode for low power consumption. Immediately we had air that would enter the house at ambient temperatures, which could be as low as -30°C, getting heated up to +8°C before entering the ERV.
The introduction of our ground loop preheating system did two main things for us:
- By raising the temperature of the fresh air supply above freezing, it eliminated the risk of freezing to our ERV filters and core. This is significant in Canada. ERVs and HRVs need measures to manage freezing conditions. Many have either preheaters – most of which are in-duct electric resistance heaters – or require the creative use of recirculated warm air from inside the ventilation system. The former can add cost during installation for the heater and much expense in operation for the electricity. The latter impacts the operation of the ventilator: during the time it is going through defrost mode there is no delivery of fresh air, nor exhaust of moist, stale air. Ground loop preheating delivers preheated air continuously at very low energy cost so that there is always fresh air for the occupants, and getting rid of stale, moist or stinky air is uninterrupted.
- Energy is saved. The benefit of “free” earth energy is gained with extremely low consumption of electrical power. The preheated air results in warmer air coming out of the ERV and out of the fresh air vents in the bedrooms and living rooms of the house. It is normal for the air to be as warm as 17°C and 18°C. Compared to around 12°C, this is a good amount of “free” energy and less risk of discomfort from cold air. Preheating the air also results in warmer air leaving the house; the more efficient the ERV/HRV core, the more heat energy is exhausted. This is not an altogether bad thing. For one, it means that less heat is lost on duct runs between the ERV/HRV and the exterior because the temperature difference is smaller than it otherwise would be. However, it does illustrate that not all of the energy gained by preheating the supply air is sent solely into the house.
If you know me, you’ll know I like numbers (could be related to the Math/Physics and other degrees). So, I couldn’t avoid looking into how much energy our system was making/saving. Fortunately, I’d instrumented the system with temperature sensors on the air both before and after the fluid-to-air heat exchanger, and had done the same for the heat-transfer fluid. The data is collected, stored and downloaded using the whole-house controller I’ve installed (more on that in a future post), so I have numbers to play with. But first let me explain a concept: COP (pronounced “Cee-Oh-Pee”).
In the ground source heat pump (GSHP) industry they talk of the Coefficient of Performance or COP. It is the ratio of energy generated to energy consumed. For a GSHP, a seasonal average COP of 3:1 is reasonable. That would mean a heating system for a house that consumes 1 unit of electrical energy (kilowatt hour/kWh) generates 3 units of heat. In money terms, that would compare to the same house using either $1,000 of electricity with a heat pump or $3,000 of electricity with baseboard radiators.
Using the first five days of data from 26 February to 3 March, I ran calculations of the energy passed from the ground loops to the air using data from both the air and fluid sides of the heat exchanger. Given that the data collection equipment is not lab-grade, and that some inputs are missing (flow rate sensing), some assumptions and allowances were made. Keeping things on the conservative side, during this period the system produced approximately 30:1 gains in energy. With our circulator running at 8 watts, we were getting an average of 250 watts of heat energy gain coming out of the ground; more when it was colder, less when it was warmer.
As the season warms up we’ll reach a point when the preheater is turned off. In the meantime, as it warms up the gains are declining. A good reason to automate it with the controller…
Looking ahead, though, the ground loops have another function that hasn’t been incorporated: space cooling. Just like the preheating system, there is a special heat exchanger incorporated into the fresh air supply ductwork after the ERV. That unit is designed to use the earth’s relative coolness in the summer to strip heat from the fresh air being sent to the bedrooms and living spaces. Not only will it cool the air, but the psychrometric chart (yes, that is the correct spelling) tells us that it will also do some dehumidification as well.
One more feature: we intend to use the ground loops to cool the house further and when necessary. By connecting them with the hydronic floor system via a heat exchanger, we’ll be able to extract further heat from the house. During warm periods the thermal mass of the floors will accumulate the heat energy that does build up in the house. Once it reaches a point where neither our night flushing (opening windows at night for natural ventilation with cooler air) nor the post-cooling heat exchanger can keep up, the floors can be connected to the ground loops and cooled down further.
Let’s step back now and look at the use of ground loops from a more objective perspective. Would they make a big difference in a conventional house (non-Passive House/built to code standards)? Certainly the primary benefits of preheating would be viable: removing risk of ERV/HRV core freezing, “free” heat and more comfort. However, the same amount of cooling would be unlikely to make much of a difference. Typically the cooling loads in a non-Passive House home are 20 to 40 times larger. Most houses also do not typically have high mass hydronic radiant floors, so there would not be the opportunity for further synergy from such a linkage. So, less of a “business case” for a conventional house, but maybe it is more obvious how ground loops could be so compelling for a Passive House.
Given that our intent was to move as far from carbon as possible, the concept of ground loops is even more compelling for us. The ability to harness comfort from the environment in a manner as elegant and natural as possible, using resources right there on site, is impossible to resist. It is my hope that by reading this, you’ll be able to understand and share excitement about how a building as efficient as a Passive House begins to change what is possible and how we can reduce our impact on the planet.
One further thought: if you were to live and off-grid lifestyle, a combination of Passive House and ground loops is a perfect fit. Most off-grid homes can never have cooling systems without massive power systems or big generators. Our approach brings the comfort of summer cooling and puts it within reach of a simple off-grid solar system. In fact, it is our intent to demonstrate it in our project. More on that later.
What’s Next? I would like to reduce the intervals between blog posts. In the near future, I’ll share some highlights of our recent work installing the fibre cement siding. It is actually a “rainscreen” and, as such, it performs a valuable function not just keeping water from penetrating the wall. The way it is installed also assists with drawing moisture out of the wall assembly. And as we know, moisture in walls can lead to nasty outcomes if not managed properly.
Another post will look at some data collected by the controller. I have a snapshot now that I think is really cool, showing a 7-day graph from this past week (what a geek, eh!) Why would you be interested? Because it shows how comfortable a Passive House can be. It also shows how a properly designed and built Passive House is like a thermal flywheel. The house just goes on and on with a little push now and again from our sun. We’ve been going 10 days now without any heating and the temperatures inside have been bouncing around between 20°C and 22°C, and occasionally 23°C. You’ll see how the temperature hardly varies between floors; from basement to the second floor. There is so much more to glean from a good graph that I know you just can’t wait either…but let’s not get ahead of ourselves. Talk soon.
I can’t find the graphs mentioned and I’d love to see them! I’m also really keen to see data from the Carleton CHEeR house but haven’t been able to find anything written up or data from the first few seasons.
Thanks for this very helpful post. We’re getting ready to break ground on a PHIUS house in Quebec and weighing the pros and cons of ground loops for our Zehnder ComfoAir 350. With the frost line going consistently deeper I wonder about the benefits (and added cost) of running the loops outside the foundation when I could run them under the super-insulated crawlspace slab. I’d love your thoughts on this. So much of the information online is from our friends to the south who don’t have to contend with our climate and also don’t have the luxury of our very inexpensive (and clean) hydrolectricity. I don’t dispute the added comfort of the system and acknowledge that energy costs are only going to climb but I do question how long the payback is likely to be when electricity is at 6cents/kWh.