The spring’s big surge of effort was put into siding the house. From the beginning we had it in mind that we wanted to work with fibre cement. We looked into other common forms of siding – wood, engineered wood, vinyl – but decided what we really wanted was the look of a quality material and the lasting nature of the fibre cement finish; an analogous argument to that for steel versus shingle roofing.
Fibre cement, however, comes with its share of issues. It’s a special order item, it’s a bit more expensive than other siding materials, it’s heavy, has to be handled very carefully, is hard on cutting tools, breaks easily if nailed too close to the edge and most importantly, dust from its cutting should never be breathed. Aside from that, no problem!
In this blog post I’ll cover the design, tool and fastener selection, and the function of our siding from a building physics perspective.
Design
Once we’d decided on fibre cement it became a choice between brands and the detailed design. Clare handled those aspects. This took place over a protracted period, during which one manufacturer was bought out and changed name. Eventually the decision was made to work with James Hardie product because of the colour ranges available.
Design elements in the beginning included horizontal lap siding, board & batten and shake styles. The main house was originally going to have a combination of board & batten and lap siding with shakes on the gable ends. The garage was going to be board & batten. That was the concept for the longest time, but in a final re-evaluation just before going ahead with the order, we chose to simplify it. The main house would all all lap siding, the laundry (central section) and garage would be board & batten – all of which would be a “heathered moss” colour – and the gable ends of the house would be board & batten in a colour called “sandstone beige”. This simplified the design, but still gave us some differentiation on large wall surfaces. Importantly, it also significantly reduced the cost because shake siding is dramatically more expensive per square foot than either lap or board & batten siding, and the gable ends are large areas!
Tools
While the design aspects were being revisited in the spring, the need for tools and fasteners had to be determined and sourced. Siding manufacturers provide installation manuals and technical documents for their products and are a must-read. They provide suggestions for means of cutting and working with their material. For this particular job, we were going to need cutting tools for “chopping” lap siding to length, ripping lap siding widths, cutting custom-shaped holes in lap siding and sheet materials (the board & batten is made up of 4’ x 10’ sheets with battens applied overtop).
One of the dust-free methods of cutting is a “score & snap” method using a knife to score a board on the finished side, which is then placed over a firm edge while pressure is applied to both sides of the board to snap it. It can produce a sharp cut line in the finish, but the core of the snapped edge can be a little uneven. For scoring, carbide blades retain their sharpness longer, are a good choice for fibre cement, and are available for a range of different knife types. We tried the score and snap method, but decided we preferred the clean finish of a board cut on the mitre saw.
Another dustless method is to use mechanical shears. Shears remove a thin strip of material from between their cutting edges, but leave one edge clean and the other a little ragged. The finished side needs to be placed down while cutting so that it gets the cleanly cut edge. Some shears are optimized for straight cuts and others for curved cuts. In my opinion, they make more sense to have around for long curved cuts because straight cuts can be made with circular saws, which provide sharper edges.
The dusty methods of cutting included mitre saws for cutting to length, circular saws which we used primarily for cutting sheet material, and table saws for ripping long boards to width. There was also the jigsaw which does produce a limited amount of dust. On occasion, we also used a reciprocating saw. For dust control and health we used personal masks (form-fitting with canisters) and we outfitted the mitre saw with a large shop vacuum that was powered via an “i-Vac” switch to turn the vacuum on and off in synchronicity with the saw. Blades for the saws were polycrystalline diamond tipped for long-lasting, sharp cuts. They aren’t cheap, but they make very sharp, almost effortless, dusty cuts (dusty even when the vacuum sucked up about 75% of the dust). The jigsaw was equipped with a carbide blade and has been found to be very useful for reasonably sharp cuts in all materials: lap siding, sheet and thick trim. The jigsaw was widely used, both on the ground and on the scaffold and the dust it made was minimal.
One more point to note: when fibre cement is cut, the edges need to be sealed. For this purpose appropriate paints have to be kept available where the cutting is being performed. In our case, it is an exterior acrylic. Fortunately under most conditions the paint does dry quickly enough that the board can be handled relatively soon after treatment.
Fasteners
There are choices of fasteners that vary between the product and the application. In our case, we were using furring strips for both the lap and board & batten, so our fasteners needed to penetrate to a particular depth into the furring. Fastener options included nails and screws, but we stayed with nails. They ranged from roofing, siding and finishing nails applied by hand and pneumatically. The mainstay for our purposes was the pneumatic roofing nailer for both lap and sheet siding. Trim and battens were fastened with the finish nailer. All fasteners were either stainless steel or galvanized. For the trim, there is an option to use tabs to hide the nails. We decided against them for a few reasons, but doubtlessly they would have provided a nice finish.
Building Science
The technical term for the function of our siding is “rainscreen”. Aside from making the house much nicer to look at than building wrap, it is the primary surface for rain (and snow) to fall on and to run down, thereby keeping the thermal barrier (the rest of the wall) dry. Of course, some rain can be pushed through the siding by wind pressures, but most of the water that makes it through will run down the inner face of the siding. This is facilitated by the primary function of the vertical furring strips: separate the siding from the wall for drainage.
In our case there are other reasons for the furring. One is that our walls have small bulges between the Larsen trusses because they are densely packed with cellulose and clad by fibreboard. These bulges become hidden by the siding because of the furring strips. The furring layer we’ve applied is 1 ½” thick, not only to hide the bulges and to provide an effective gap for drainage, but also to support the convection of air between siding and sheathing. This convection layer is important because it is a source of drying potential that sucks moisture out of the wall assembly, particularly when the sun is shining. We know that moisture can be driven into a wall from the interior due to higher humidity levels and from infiltration, particularly during the winters where the water vapour can condense inside the wall. It can also be driven from the outside by rain and humidity in the other seasons. And we know that high moisture levels can lead to deterioration of the effectiveness of insulation. When warmth is added, it can lead to mould and rot. Accordingly, adding drying capabilities to the wall is a very good thing.
Another “building-sciency” thing we did with our house is to over-insulate the window frames. This is not an uncommon practice in Passive House building, but is rarely done elsewhere. The purpose is to reduce the exposure of the window frames to the cold (or hot) environment, thereby reducing heat loss (or gain). Unfortunately, this does make for a complex wall assembly that can be time-consuming to install. You may recall from an earlier post or from a visit to one of our Open Houses, that our windows are installed close to the middle of the almost two foot thick walls. Coupled with over-insulation on both the inside and outside of the frames, mid-wall installation is the most effective treatment for reducing heat loss. It also results in large sills both inside and out, and a nice, recessed window appearance. From a passive solar perspective, it is also a compromise between windows that are flush with the exterior to maximize solar gain, and windows that are flush with the interior that maximize self-shading. Both can be useful depending on the design and all these elements are accounted for with the thorough Passive House design and energy modelling that we do.
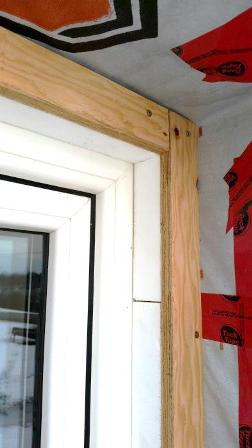 Back to the exterior over-insulation: we added 2” of EPS foam to the outside of the window frame. It was held in-place with strips of ¾” plywood and long screws into the window bucks.
The plywood was given an extra layer to produce a 1 ½” wide nailing strip for the eventual application of a fibre cement return for the jambs and head. The face of the head and jambs were also given a surround of plywood or SPF (spruce, pine or fir wood) to square off the opening and provide the other nailing strip for the returns.
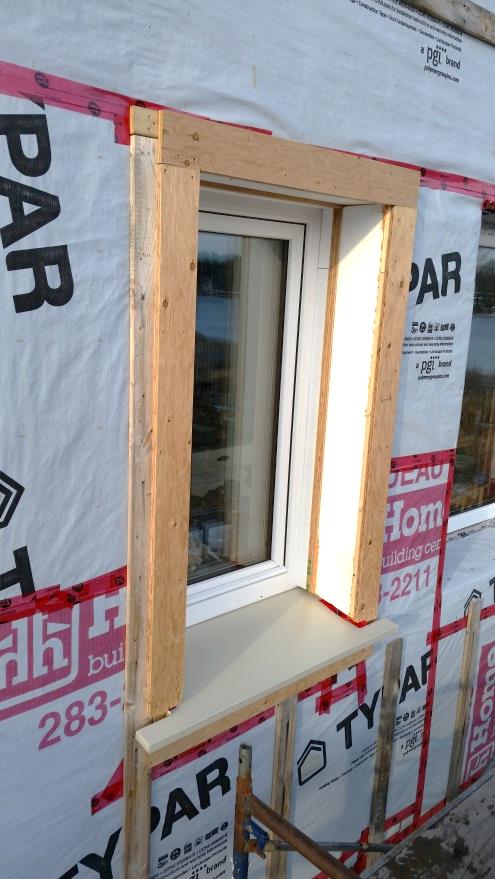 Not yet mentioned – and actually the first step in the process – was the making and installation of custom sills. They were about 15” in depth from window to exterior drip edge and made with a plywood core and an aluminum cover fashioned on-site from flatstock. The window side of the aluminum has a lip that runs up under the window so that the windows lap over the sill edge, and there is an upward fold on the sides. They were yet another custom job that is time-consuming, but unavoidable given the depth of the window.
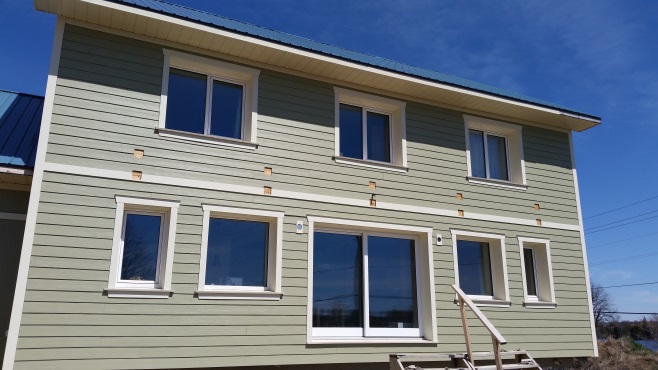
Southern fascade. Note the mounting points for our future PV awning.
At the time of writing we’ve taken a pause from siding installation so that I can get out and service a number of client PV and solar thermal sites. So far we’ve progressed with the siding with only the least accessible parts of the main house missing the lap siding and most of the garage has the “board” in place and is awaiting the battens. Once we have the garage done we’ll focus on the Eastern gable and then get a mobile lift for the walls over the laundry room. That should be a little easier on the legs and back.

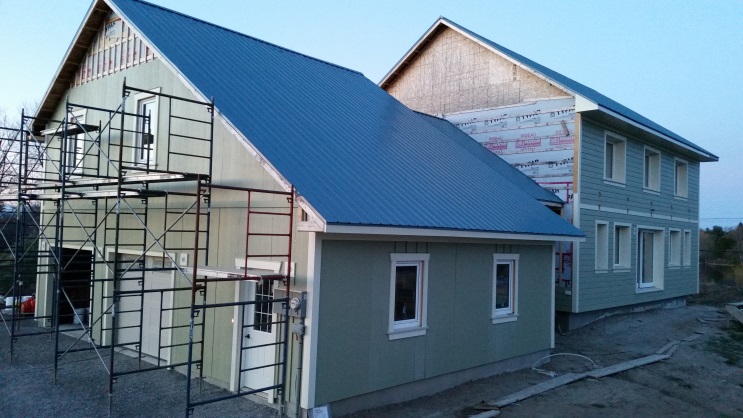
North side which shows Eastern gable over laundry room where we’ll need a lift for siding.
Garage West
Upcoming Posts
As for future post topics, there is a lot to discuss concerning the control system and all the data being gathered by it. Yawning? Bored by graphs? Well, maybe I can’t make you a math-lover, but I think I can help you understand some of the beauty that I see, or how the graphs reveal important features of our Passive House like, for example: how it maintains comfortable temperatures for days without a furnace or boiler, or how those comfortable temperatures are consistent throughout the house – basement to top floor.
Another topic is the PV systems for the house. Where we are situated on the Merrickville F2 feeder, we’re constrained by grid capacity, but we managed to get the last 7 kW earlier this year. At the time the microFIT program was open, but many factors drove us down the Net Metering route. As designed, the house has space for 55 PV modules split between grid-tied and off-grid/grid-interactive architectures, but the intent was to put 10 kW into the grid-interactive component, even though it was way more than required to offset our electrical requirements once the build is complete. So, we’re now considering what the proper mix will be. More on that in a future post.
No comments yet.